 |
| Diamond shaped inside out beads from Claire Maunsell (Sorry folks, these are sold. Aren't they great though?) |

Showing posts with label beads. Show all posts
Showing posts with label beads. Show all posts
Thursday, January 31, 2013
Update on The Book!
I was recently taking care of some legal permission-y, copyright sort of stuff for the upcoming polymer clay book by Cynthia Tinapple. We now have a tentative title and a bit of an idea of what the cover might look like and its starting to feel...real.
One thing I really find exciting is that beyond the 13 featured artists (of which I am one) and their projects there will be work from 125 artists from around the world featured gallery style. Sounds like it will surely appeal to us visual types who like books heavy on pictures!
Wednesday, November 14, 2012
Don't forget the knot
Yesterday I added the last bead to this necklace and then dropped it to the floor. Beads went everywhere and two are now lost in "the bead vortex". (Do you have one? That place where beads that you JUST HAD in your hand get sucked into only to be found 12 months later?) And I am talking about the big beads, not the the tiny ones.

I crawled around on my knees for a while, searching, eventually adding other beads that work better anyway. Here it is completed and now posted to the shop. (with a very secure, glued, triple knot!)

Friday, November 9, 2012
Just Keep Carving
Sometimes things don't work out initially but rather than give up you need to just keep going. I thought my initial carving with these beads was "flat" from a design standpoint.


But the second stage of carving I did really helps these little cactus-ish beads (Cactus, boulder, mountains? Not sure.) Next step will be to try adding some colored pencil and securing it with Genesis medium.
Have a great weekend! I was hoping to get out for a hike but the boy's yucky, nagging coughs will probably keep us at home. More time to carve.
Thanks for reading!
Monday, October 29, 2012
Hurricane Sandy
We hunkering down here in south central PA. Hurricane Sandy is suppose to make landfall within the next 2 hours or so and the eye will be passing perhaps just over us sometime after dark. Not thrilled about that. We've been told to prepare to shelter in place and probably be without power at some point.


The super great skylight in my studio is proving not so great - its leaking. We've had this happen before but I definitely think its worse this time. I moved supplies around and everything is safe. I baked a tray of beads and other pieces this morning to keep me busy if/when the power goes out.
Tuesday, August 21, 2012
The End of Summer
We are squeezing the end out of summer vacation fun with school officially starting on Wednesday.
I usually do a bead clear out this time of year so there will be some in the shop throughout the next week. I'm breaking my own rule of never selling any of my carved beads - only a couple though.


Tuesday, July 31, 2012
The voices in my head
Back in my studio and it feels good.

Between filling orders I'm working on taking my carving in new directions, carving more like a linocut. I carve, I wonder, I carve some more. This is what is sounds like in my head.
"Could I print with polymer plates?"
"Could the carved piece, which is also part of a necklace, first be used to make a print thus creating 2D and 3D art that is related?"
"Where could I go with this?"
I'll keep this conversation going. Hope you are having a good week too!
Wednesday, May 23, 2012
All my current Etsy orders are now completed and shipped so I'm back to working on gallery pieces for the polymer clay book. I've been fiddling with these island pieces for quite some time now. Hoping if I fiddle some more something will coalesce.


We're winding down our school year with just days to go. Amidst the flurry of putting together portfolios we all felt like getting out would do us some good. Samuel has expressed some frustration with drawing animals because they move so I thought getting out to the nature center would be more fun than drawing animals from photographs. I did some sketching too and felt rusty. I haven't been drawing enough lately.
Tuesday, January 17, 2012
Toga Beads How-to

Here's a short how-to for making what I call, for lack of a better name, toga beads. They remind me of marble "fabric" drapped on classical statues.
All you'll need is white polymer clay, a cutter, needle, black acrylic paint, paper towel and possibly some steel wool.
1. Make a ball of white clay about double the size that you want the finished bead to be.

2. Pinch and twist opposing sides of the ball making "handles" (sort of) and continue to twist until the bead has layers/twists to suit you. Less twisting will result in thick folds, more twisting results in thinner folds.


3. Carefully cut the handles off the ends of the bead.

4. Pierce, flat end to flat end, with a needle and bake standing up on one end or using a bead rack.

5. Brush with black acrylic paint, getting the paint into all the indentations, then immediately removing paint from the "high spots" with a paper towel. After the paint dries if you find you want more white showing, remove even more of the black paint with steel wool.


Black and white gives these beads a marble/toga feel but different colors of clay and paint would be fun too!

Tuesday, November 1, 2011
Elements
Lots of new parts and elements floating about. I'm still wondering how they'll all come together.


 I find I like the sides of the beads for a new bracelet as much as the tops.


 I find I like the sides of the beads for a new bracelet as much as the tops.
Monday, May 23, 2011
Hazards on the job
Big orders, lots of beads...beads, beads, beads. Soreness in one hand led me to try making the same small beads between the thumb and pointer finger of my other hand and lo and behold, I am polymer ambidextrous! (well, at least with that kind of bead)

This is one of the "rest" projects I am working on after both hands get stiff. I cut into my thumb on Saturday because I was carving and not wearing my leather finger protector. Amazingly its just about healed already. And I've learned my lesson.

This is one of the "rest" projects I am working on after both hands get stiff. I cut into my thumb on Saturday because I was carving and not wearing my leather finger protector. Amazingly its just about healed already. And I've learned my lesson.
Thursday, April 14, 2011
Testing the waters
I'd been considering making/selling more loose beads lately (being encouraged by Claire's success with beads over at stillpointworks and several requests from customers) to broaden what I have to offer in my Etsy shop. Feeling a bit frustrated with some necklaces I am working on, I decided to scale back on complete jewelry for a week or two and just work on beads, planning to post some sets and test the waters.

The first sets of Debris beads sold within hours which is pretty cool! Re-listing! b

The first sets of Debris beads sold within hours which is pretty cool! Re-listing! b
Tuesday, March 22, 2011
Just a peak
A peak at carving work. I've done totally carved beads so now I am moving toward partially carved surfaces and forming organic shapes.

I am venturing into aluminum foil core beads because I need to work on weight of finished pieces. Why didn't I try this sooner?!

And one last peak... a peak at my house (and my Yellena prints) on the Artisan's Gallery Blog.

I am venturing into aluminum foil core beads because I need to work on weight of finished pieces. Why didn't I try this sooner?!

And one last peak... a peak at my house (and my Yellena prints) on the Artisan's Gallery Blog.
Tuesday, March 8, 2011
The day was made
I got a lovely email this morning from Delphine of Le Blog du Coolest. She posted the necklace she made (below) after seeing my fiber bead tutorial last November and another necklace incorporating her "quotation" of my moon earrings. Very cool to see her take on these textures. You really made my day, Delphine. Thank you!
 Several big custom orders have kept me very busy these past 3 weeks or so. I've really been feeling like I needed to stretch myself more in regard to construction so when a request came along for a necklace version of my Sediment bracelet I knew it was meant to be. Here's the necklace in progress. I wedged the beads at the bottom to help create the curve without a lot of gaping.


What kind of clasp to use was probably my biggest hurdle. I sketched. I stared. I sketched. I stared. I wanted something simple and sturdy but also something that was incorporated into the overall design so a purchased clasp was out. I finished it tonight and will hopefully get some good photographs tomorrow before its shipped to its new home.
 Several big custom orders have kept me very busy these past 3 weeks or so. I've really been feeling like I needed to stretch myself more in regard to construction so when a request came along for a necklace version of my Sediment bracelet I knew it was meant to be. Here's the necklace in progress. I wedged the beads at the bottom to help create the curve without a lot of gaping.

What kind of clasp to use was probably my biggest hurdle. I sketched. I stared. I sketched. I stared. I wanted something simple and sturdy but also something that was incorporated into the overall design so a purchased clasp was out. I finished it tonight and will hopefully get some good photographs tomorrow before its shipped to its new home.
Thursday, December 9, 2010
Weak in the knees
Sales of my work at terrain are picking up (hurrah!) so its time to order more beads for the etched pearl necklaces. Looking around and considering some other purchases here. I find beat up old beads very appealing. Archeology meets jewlery - whats NOT to like about that?!


Of course beat up old beads often come with a price. "Don't get too attached to that last strand", I said to myself. They are tile beads from Afghanistan thought to be about 2000 years old. A strand of 21 beads costs $120. Gosh - it would be like wearing a museum around your neck!


Of course beat up old beads often come with a price. "Don't get too attached to that last strand", I said to myself. They are tile beads from Afghanistan thought to be about 2000 years old. A strand of 21 beads costs $120. Gosh - it would be like wearing a museum around your neck!
Monday, November 22, 2010
Its simply nice to share
Along the way, I've had some polymer artists extend themselves and share their knowledge and present me with great opportunities. Kindness should overflow, shouldn't it? So it seems appropriate that I make my first small attempt to 'give back' with a tutorial at the beginning of America's week of Thanksgiving.
( A special thanks to Ronna, Cynthia, Claire, Lynn, Tracy, and Christine.)

There has been some interest in my fiber-y beads so here goes. Yes, yes, its simple (but I tend to be pretty simple) and they make a nice contrasting texture with smoother beads .

1. Roll a ball of clay.

2. Flatten slightly to make a chunky disk. Put a hole through the center to made a bead.

3. Cross hatch with a tissue blade all around the sides. Don't leave too much blank space. Change the angle of your blade after 5-7 or so slashes tilting the blade so that your lines cover the entire side of the bead. Cross hatch but with a blade.


4. Squeeze either side of the bead with your fingers to make the cross hatch lines open up, revealing a fiber-y sort of pattern. And you will probably need to re-open the bead hole at this point too.


Here are the beads used in a finished piece. They can be used as is, sanded to make the raised areas shine in contrast to the "canyons" or, as I usually do, I distress with acrylic paint to enhance the texture.

(Please feel free to use the beads anyway you want. Crediting me would be nice. Sending me pictures of what you made would be great too and I would be happy to post your projects here.)
Tuesday, November 2, 2010

Monday, August 30, 2010
Creation and Evolution
I am on Voila today in the Current Topic Series: Evolution!

I am amazed and thankful for the opportunities that come my way, weaving themselves into my creative process. Finishing this bracelet, thinking through my process and retracing my steps was a great experience.
 Tomorrow we start back to school and as part of the writing process I teach my kids to read compositions out loud, to slow themselves down and self critique their work before I read it. They want to rush and skip this step (just like I do) but slowing down and actually hearing what one writes weeds out mistakes and hones the strengths. Being part of Voila's Evolution Series was similar for me. I was forced to think about what I was doing because I had to write the "story" of how this bracelet came to be.
Thank you, thank you Christine Dumont!
Thursday, August 12, 2010
First....look!
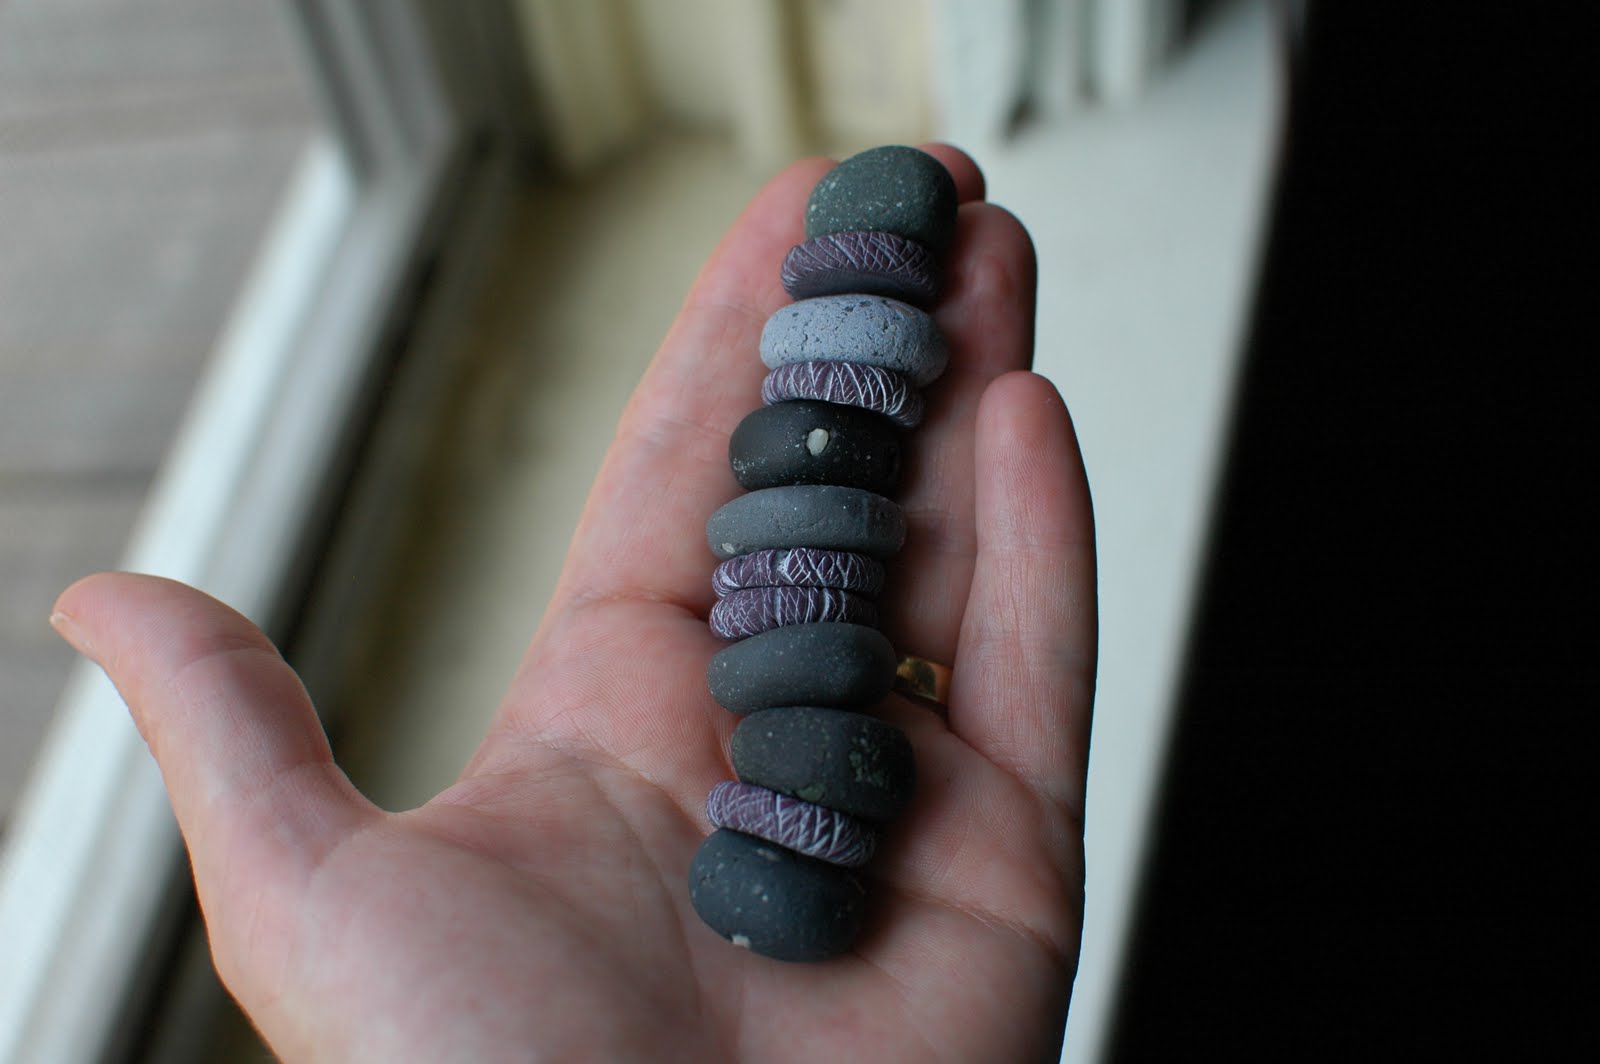
I would have thought I'd come home from vacation permanently hunched over from all the time we spent looking closely at the stones, shells, sea glass, sand dollars and seaweed strewn across the beaches of Matinicus last month. I looked at pebbles closely, as I had been taught to do in Tracy Holmes class "A Day at the Beach, developing a criticial eye in regard to my own polymer clay versions. (This echoed my Dad's drawing instruction when I was little "always look at the thing you are drawing MORE than at your piece of paper".)
Here's my fiddling around. The more realistic looking ones have been sanded; the others are rough.

This might be what happens next.

And I am definitely headed in this direction but with custom sterling rings.

Here's my fiddling around. The more realistic looking ones have been sanded; the others are rough.

This might be what happens next.
And I am definitely headed in this direction but with custom sterling rings.

Subscribe to:
Posts (Atom)